
Tracking Settings
Click the  icon or press ⌘+, to open the settings window. Most tracking settings are in the “Tracking” tab.
Changing Tracking Method
Section titled “Changing Tracking Method”
Each body part’s tracking method is initially set to “Default”, which tracks you with the Mac’s camera. You can also use external apps such as the iPhone tracking app or mocopi, or turn tracking off with “None”. “Hand” and “Finger” are only in VCam.
When “Mirror your movements” is on, the avatar moves like your reflection in a mirror: raise your right hand, and the avatar raises its left hand. Turn it off, and the avatar moves the hand on the same side.
Changing the Device in Use
Section titled “Changing the Device in Use”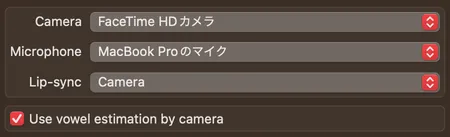
If you want to use an external webcam or microphone, change it here. If the camera you chose isn’t found, VCam tracks with another camera and switches back automatically when you reconnect it.
You can choose the camera or the microphone for lip sync. With the camera, turn on “Use vowel estimation by camera” and the mouth shape changes with your vowels. With the microphone, adjust how much the mouth moves with “Lip-sync sensitivity (mic)”.
When a model that supports Perfect Sync is tracked with high-precision face tracking or the iPhone tracking app, the mouth also follows the tracking, so “Lip-sync” isn’t available.
High-Precision Face Tracking
Section titled “High-Precision Face Tracking”Turn on “Enable high-precision face tracking” to track your expressions in detail with the Mac’s camera, down to your eyebrows, cheeks, and the corners of your mouth. A model that supports Perfect Sync moves with Perfect Sync.
It’s on by default on a Mac that supports it. On a Mac that doesn’t, it can’t be turned on.
VCam Hand Tracking 3.0
Section titled “VCam Hand Tracking 3.0”Turn on “Enable VCam hand tracking 3.0” to switch hand and finger tracking with the Mac’s camera to a new method. It estimates where your hands are in 3D relative to your face, so a hand held in front of your face also comes in front of the avatar’s face. Before you use it, run “Hand Tracking” in Calibration.
It’s only in VCam and works on a Mac with Apple silicon. It’s on by default on a Mac that supports it.
Calibration
Section titled “Calibration”Choose an item from “Calibrate” at the bottom right of the main window.
Face Tracking
Section titled “Face Tracking”Use this when the avatar’s face points in a different direction from yours. Face the camera, look at it, and click “Start”. After three seconds, the direction and position of your face at that moment are set as the front. This works while you’re tracking with the Mac’s camera.
In VCam, you can also choose Model > “Calibrate” in the menu to set it right away.
Hand Tracking
Section titled “Hand Tracking”This lets VCam hand tracking 3.0 estimate the depth of your hands correctly. Click “Start”, then follow the onscreen guide and hold these two poses:
- Keep your palm facing the camera and touch your cheek with it
- Keep your palm facing the camera and stretch your arm straight forward
The result is saved and used the next time you open VCam. If “Measurement failed.” appears, check that your hand is in the camera’s view, then click “Start” again.
Adjusting Body and Hand Movement
Section titled “Adjusting Body and Hand Movement”In VCam, you can adjust how the body and hands move with these items. While mocopi is connected, the body items can’t be changed.
- “Body follow-through”: How much your face movement carries into the upper body. At 0%, only the head turns
- “Weight of shoulder rotation”: How much the shoulders follow when you move your arms
- “Elbow offset”: Adjusts the direction of the elbows
- “Finger opening sensitivity” and “Finger closing sensitivity”: Appear when you’re not using VCam hand tracking 3.0
Raise “Smoothing” to make the movement smoother. The higher it is, the more the avatar lags behind you.
Eye Tracking
Section titled “Eye Tracking”When this is on, the camera captures your eye movement and moves the avatar’s eyes up, down, left, and right. Adjust how much the eyes move with “Horizontal sensitivity” and “Vertical sensitivity”.
“Blink” chooses which eye to use for blinking. If blinking isn’t detected well in one eye, for example with tinted glasses, choose the eye that’s detected well, and its blinks are applied to both eyes. Choose “Auto” to blink automatically without using tracking.
Improve Tracking Quality
Section titled “Improve Tracking Quality”Position Relative to the Camera
Section titled “Position Relative to the Camera”Keep your face in the center of the camera image. The face size in the following image is recommended. You can check how you appear with QuickTime Player or a similar app.

Changing Camera FPS
Section titled “Changing Camera FPS”The higher “FPS (tracking)” is, the smoother the avatar moves. It also makes tracking heavier, so adjust it to suit your Mac. The maximum value is recommended.
Reporting a Tracking Issue
Section titled “Reporting a Tracking Issue”Click “Record diagnostics” under “Diagnostics” to record the values and timing of the tracking data for up to 10 minutes. Keep recording until the issue happens, click “Stop recording”, then click “Show in Finder” to find the saved zip. Attaching the zip when you report through “Contact” on the VCam website helps find the cause. Camera video and models aren’t included.