
Backgrounds and Light
Shooting with the front camera removes you from the background as much as possible.
Switch Between the Front and Back Cameras
Section titled “Switch Between the Front and Back Cameras”In “Snap”, you switch between the front and back cameras from the background. Tap the background button at the top right and choose “Camera”, and “Front Camera” and “Back Camera” appear below it. When the background button has rotating arrows at its lower right, you can switch cameras there.
In “Studio”, choose the camera for the background in the same place. Both appear only on devices that can use the front and back cameras at the same time.
Hide Me
Section titled “Hide Me”In “Hide Me” under “Advanced” in settings, choose one of three levels for how the area where you were is filled in. It appears when the background is “Camera”.
- “Low”: Fills the area with the surrounding colors. This uses the least processing power
- “Medium”: Fills the area with the background the camera has seen so far
- “High”: Also fills in parts the camera hasn’t seen by guessing them
“High” needs to download extra data before you can use it. Until it’s ready, it shows as “High (Preparing)” and hides you the same way as “Medium”. If the download fails, tap “Try Again”.
“Medium” and “High” use what the camera has seen. Move iPhone around a little before you shoot to capture your surroundings, and the result is more accurate.
Shoot Inside a Photo You Took
Section titled “Shoot Inside a Photo You Took”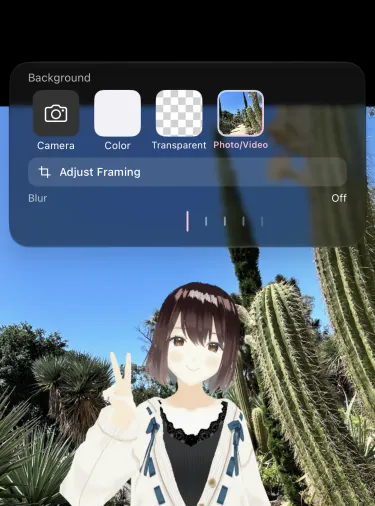
Set the background to “Photo/Video” to shoot with a photo or video you already took as the background. This is handy when you want to add your avatar afterward.
You can also select a photo or video in Photos or another app, share it, and choose “VCam Camera”. VCam Camera opens with it as the background.
When the background is “Camera” or “Photo/Video”, use the “Blur” scale to choose how much to blur it.
“Transparent” saves the avatar cut out with no background at all, ready to drop into a video edit or a stream. You don’t need a green screen, so the result comes out clean. “Transparent” is available with Pro.
Adjust the Background Framing
Section titled “Adjust the Background Framing”When the background is “Photo/Video”, “Adjust Framing” in the background list lets you change what part of it shows.
- Drag: Move it
- Pinch: Zoom in
- Double-tap: Reset the position and zoom
Correct “Straighten”, “Vertical”, and “Horizontal” with the dials. Correcting the perspective straightens the slanted lines of a building shot from below. Double-tap a dial to set just that one back to 0. The buttons at the bottom rotate the picture 90° counterclockwise and flip it horizontally.
Tap the checkmark button to apply, or the × button at the top left to go back to how it was. Tap “Reset” to reset the position, zoom, straightening, perspective, rotation, and flip all at once.
Match Background
Section titled “Match Background”Turn on “Match Background” under “Lighting” in the menu, and the brightness and color of the background are applied to the light on the avatar. For example, the light is warm in an evening photo and bluish in an aquarium photo. Turn it off, and the avatar is lit the same way on any background.